Creating a mosaic is super easy. Just pick your big picture, and add your small pictures. But creating a great mosaic requires a bit of know-how. This guide will go over 5 ways to turn any mosaic into a masterpiece.
A good big picture is simple, bright, and colorful, but ultimately, the picture you love the most is the best big picture. But you can tweak any big picture to make it better. Simple tweaks like cropping the big picture, and increasing the brightness, exposure, contrast, and saturation can have a huge impact on the look of your mosaic. This is by far the easiest, and the most bang-for-buck thing you can do to improve your mosaic.
Novices want to see the big picture as clearly as possible. They think that's what makes a mosaic, a mosaic, but anyone who's actually had a mosaic on their wall will tell you, the small pictures are what they love the most about their mosaic. It's the memories. Every time you walk by it, and glance at the small pictures, it jogs up all kinds of memories. This is what makes it fun, and what makes you look at the mosaic over and over. It's a dose of happiness, and a splash of joy. The big picture, with no disrespect, is just a very cool bonus after a while. We have so many wonderful memories/photographs stored on our phones, yet we rarely look at them. And we can't just print all of these photos and hang all of them on the wall, as that would be a mess. But a photo mosaic lets you do just that, all while creating a beautiful big picture that you love.
So, many people underestimate the importance of small pictures, and often ask us this silly question. What the minimum number of photos needed to make a mosaic? And our answer is "as many as possible", but they will often keep asking to try get a number. We know we're all so very tired, and often times trying to be efficient and do the minimum possible, but it would a huge disservice to you if we told you you need a minimum of say 100 photos, and you just add 100 photos, when you actually have thousands of photos on your phone.
But don't just add all the photos. More important than the quantity of the photos, is the quality of the photos. Some of us have lot of food photos on our phones, but when you see food photos on your mosaic, doesn't matter how delicious it was, it doesn't compare to faces of the people you love. So, while dumping literally all the photos on your phone might seem like a good idea, a better idea is to dump your "Favorites" album if you have been carefully curating your favorites album.
But suppose the mosaic isn't for your significant other, and dumping your favorites album doesn't make sense. Or maybe you're not the photographer of the family. You can collaborate with other family members, or colleagues, or community to gather meaningful photos. You can allow other people to add photos to your mosaic, and it will mean that much more for the recipient. And if this is a surprise for your significant other, and you don't want them to know, just ask them to send you their favorite photos.
So once you've nailed down the big picture and the small pictures, arguably are the most important things about your mosaic, you can start to hone in on your preferences. Some people like to see the big picture as clearly as possible, while some people want nothing to do with faking a mosaic, while some people try to strike a balance depending on their taste. We try our best to set these for you automatically, but sadly, we can't read your mind. This is precisely why you have control over the colorization, so you can try out different settings and figure out what you like. A good starting point is 40%. This means your big picture is superimposed on top of the small pictures 40% big picture, and 60% small picture. You can lower this to be able to see the small pictures more clear, or increase this to be able to see the big picture clear. There is really no good reason to go over 60%, and you should try to set it as low as possible while you're still happy with the way the big picture looks.
Setting the mosaic dimension is a bit more tricky and restrictive. First, the mosaic dimension is how many tiles there are horizontally and vertically. Higher the mosaic dimension, the better your mosaic looks, and more pictures you can fit into the mosaic. But higher the mosaic dimension, the larger you have to print it in order for you to be able to see each small picture. For example, if you plan to print your mosaic 10 by 10 inches, and you set your mosaic dimension to 100 x 100 tiles, your small pictures are going to be just 0.1 x 0.1 inches tiny, and you really won't be able to see any of the small pictures at all, and the mosaic will just look like a blurry mess. So what you need to do is decide how large you're going to print it, and then set the mosaic dimension accordingly so that your small pictures are at least 0.5 x 0.5 inches. Anything smaller than that, you're going to wish the small pictures were bigger.
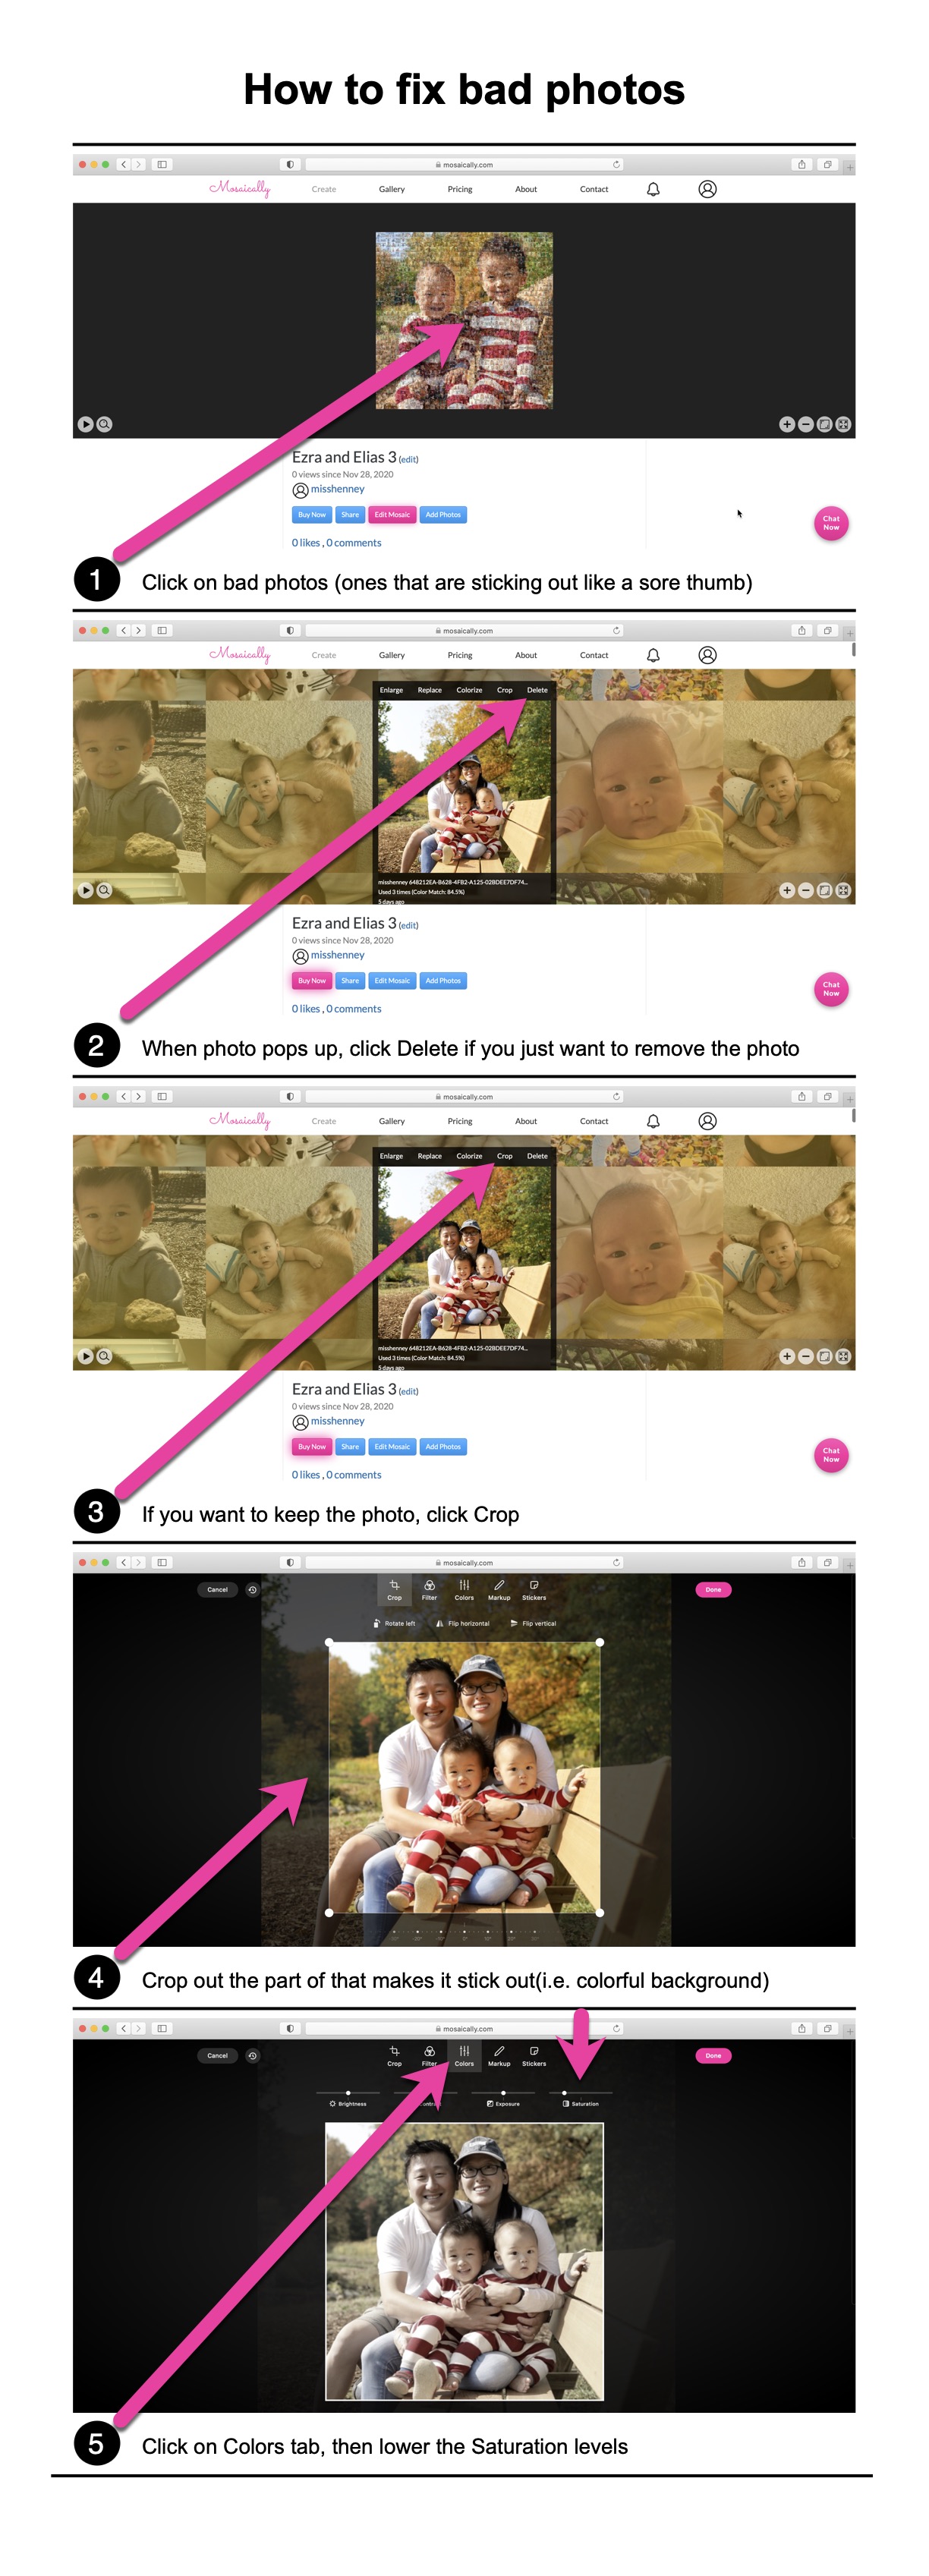
"Bad" photos are photos that stick out like a sore thumb. For example, let's suppose you have a nice simple big picture of a face. There's no area in the big picture where it's red. But you have a small picture that is completely red. This picture is going to stick out, and it's obvious. It looks like pimples on the face. So, just delete it, or desaturate it, and it will make the mosaic so much better. This is such a simple thing to do, that not enough people take the time to do. You can simply delete it, or if you really like the picture, desaturate it enough so that it doen't stick out. Desaturating is a process where you remove the colors of a picture to make it black and white. You don't have to desaturate it all the way to make it black and white, but enough so that the bright colors don't stick out so much.
Once you've tried your best, and think you got it, ask for assistance. It could be that there's no room for improvements, but often times we see room for improvements that have gone unnoticed. We rarely see a mosaic that doesn't need any improvements at all. We've been doing this a long time, and have seen a thing or two, and we're here to assist you, so just ask us by clicking Chat Now at the bottom right corner of our site, and we'll take a look.


